Leave A Message
If you have questions or suggestions,please leave us a message,we will reply you as soon as we can!
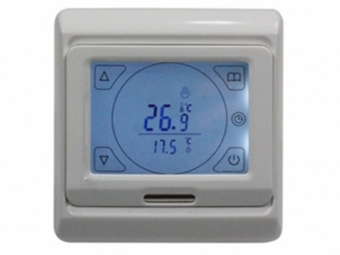
Product Name:E1608 Digital Smart Wifi Electronic Heat Thermostat
Product Technical Parameters
| Thermostat range: -9.5~80.0℃ | Overall dimension: 86*86*40mm |
| Temperature sensing elements: thermistor | External wire diameter: 2,5 square mini-meter (mm)² |
| Temperature control precision: ±1℃ | Working temperature: 85~265VAC 50\60Hz |
| Mounting hole spacing: 60mm (standard) | Shell: flame retardant PC material |
| Floor temperature range: -9.5~80.0℃ | Rated power: 16A |
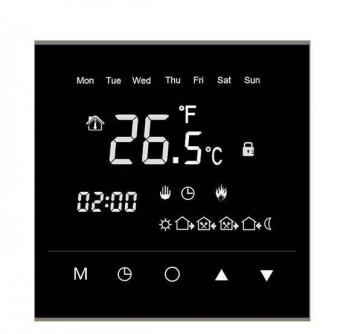
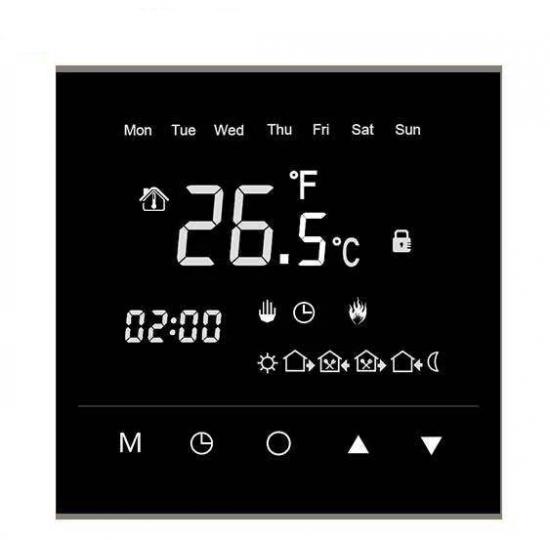
Notes of display

Product Operation Instruction
1) On/Off: briefly press “On/Off” button to switch on.off the thermostat.
2) Set temperature: with the unit on, briefly press the “▲”or“▼”buttons to adjust the temperature, and each pressing will set up the temperature change by 1℃.
3) Mode switching: with the unit on, keep the “Set the time” button pressed for 3S to switch the manual or automatic (time interval) mode.
4) Manual switch: with the unit on, briefly press the “Menu key” in turn button to switch to the standard mode and economic mode, and and briefly press the “▲”or“▼” buttons to adjust the corresponding setups of temperatures.
5) Time setup: keep the “Set the time” button for 3S to enter the time adjustment setup. Briefly press the “Set the time”in turn to adjust the flashing minutes, hours and week days. Briefly press the “▲”or “▼” buttons to adjust the relevant time.
6)Child lock setup: keep the “▼ ”pressed for 3S to switch on or off the Child lock function.
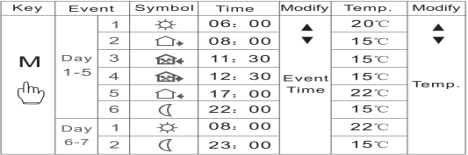
7)Period Setting: After power off, press and hold “Menu key ” for 3s to enter the period setting function.Detailed operation is as follow
8)Advanced settings: with the unit off, spontaneous keep the “▲”or“▼” buttons pressed for 3S to enter the advanced setting function and the specific operations are shown as below:
|
Numerals on the upper right corner |
Definition of the |
Range |
Note |
Default |
Operation |
|
00 |
Adjusted values of room temperature |
±10.0℃ |
Fine-tuning values of the room temp. sensor |
0℃ |
Press button to switch the parameter values and press DONE button to exit |
|
01 |
Adjusted values of floor temperature |
±10.0℃ |
Fine-tuning values of floor temp. sensor |
0℃ |
|
|
02 |
Sensor selection |
00-02 |
00 built-in 01 external 02 built-in and external |
02 |
|
|
03 |
Setup of temperature upper limits |
30-60℃ |
Setup of maximum temperature values |
35℃ |
|
|
04 |
Setup of temperature lower limits |
5-15℃ |
Setup of minimum temperature values |
5℃ |
|
|
05 |
Setup of switch deviations |
0-10.0℃ |
Setup of output deviation values |
1.0℃ |
|
|
06 |
Low temperature protection function |
00-01 |
00 Off o1 On |
00 |
|
|
07 |
Selection of holiday |
00-02 |
00 double off-days 01 single off-day 02 no holiday |
00 |
|
|
08 |
Delayed output time |
00-10 |
0-10S delayed output time |
00 |
|
|
09 |
Warning value of floor temperature |
0-80℃ |
Max. Value of floor temperature |
60 |
|
|
10 |
Restore factory setting |
00-01 |
01 restore factory default |
00 |
Initialize Your WIFI Thermostat:
After turn off the thermostat, press and hold the“ON/OFF”until the screen displays "000", then press“▲”,change the value “000” to "010", finally press the “ON/OFF ”. Finishing all the above steps, the initialization of your thermostat has been successfully completed. You can download the APP to connect the
thermostat to your mobile phone, then control your thermostat according to the APP operation manua.
Malfunction Prompts:
In advanced setting, select the internal or external sensor properly,if wrong setting or sensor damaged, the LCD appears Er1 or ER2.
ER1 indicates no internal sensor detected;
ER2 indicates no external sensor detected.
The thermostat will not work until the fault is eliminated.
Wiring Diagram
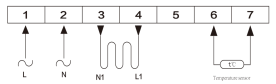
Warning:
Wiring must be correctly carried out as per the above diagram. The thermostat should be free from
water, mud and other foreign substance, otherwise it could be damaged!
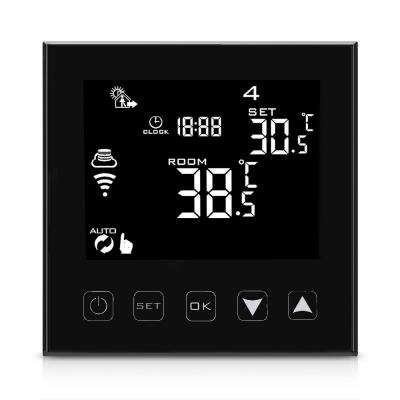
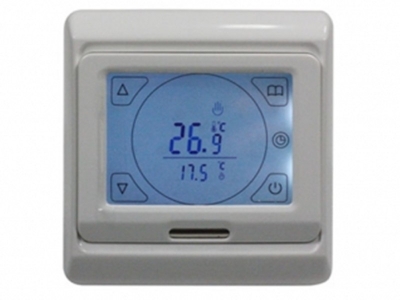
Heating Thermostat User Manual Many thanks for your selection of our products and services, and also for your trust and support to us. Features Appearance (1) Standard total Size is 86*86mm (2) Touch buttons to make simple operation (3) The visible thickness above the wall is only 15mm86mm (4) hidden box and 60mm European box (5) Display size : 64*64mm (6) Color:white,black Functions (A) Including built-in sensor and external sensor (B) 0.5°C accuracy keeps temperature within the level you set. (C) Children lock to prevent misoperation by children (D) Data memory when power is off. (E) Holiday mode make you enjoy more comfortable temperature in holiday (F) The temperature of external sensor can be checked Product Specifications ☆ Power: 90-240Vac 50/60HZ ☆ Range of temperature display: 0~40°C ☆ Max. control accuracy: 0.5°C ☆ Probe sensor: NTC(10k)1% ☆ Contact capacity: 3A/250V(WW);16A/250V(WE) ☆ Output: Switch relay ☆ Limit temperature range: 0~70°C ☆ Insulating condition: Normal environment ☆ Default setting temperature range:5~35°C ☆ Size(mm):86*86*27 Before wiring and installation 1.Read these instructions carefully. Failure to follow them could damage the product or cause a hazardous condition. 2.Check the ratings given in the instructions and on the product to make sure the produce is suitable for your application. 3.Installer must be a trained experienced service technician. 4.After installation is complete.check out produce operation as provided in these instructions CAUTION Electrical shock or equipment Damage Hazard. or short equipment circuitry. Disconnect power supply before installation Sensor fault display:please choose correct working way of built-in and external sensor, if choose wrongly or sensor fault (breakdown), “E1” or “E2” will be displayed on the screen. Thermostat will stop heating until the fault is eliminated Warranty: We offer the warranty of 18 months, from the sales day. The products of our company can have lifetime warranty ,if it is not the quality problems, or beyond the warranty period, we will charge for the after-sale service
Learn More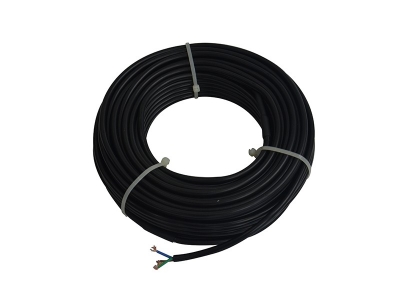
HRSHTV heating cable is designed for both roof and gutter or ground applications. HRSHTV is a twin conductor heating cable for easy installation with zero EMF.
Learn More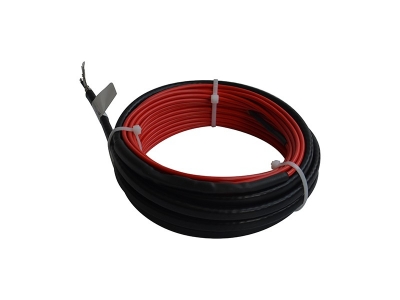
Product advantages 1.Durable and strong structure 2.High water-proofness. IP68 3.Long working life 4.25years warranty 5.Small size ,no increase in floor thickness 6.100% screened with Zero EMF 7.100% tested before delivery 8.Free of maintenance Features and applications: • Round-shape structure, flexible installation. • About 3.6 mm diameter, convenient for installation. • Twin conductor structure with one end cold lead for easy installation. • Zero EMF. • Can be used safely in wet conditions like bathroom. • Quick and easy installation. • Durable structure, long service life requiring no maintenance. • 15-year warranty for quality only, not including wrong installation and misuse. Warranty: 15 years limited warranty against defect in material, design and workmanship. 120V Length Heating area Total Power/W (3.65W/ft) Current/Amps Resistance Ω/m Part Number m ft 11W/ft² 14.5W/ft² HRVC-60-1 5.05 16.5 5.5 4.1 60 0.5 240.0 HRVC-120-1 10.1 33.0 10.9 8.3 120 1.0 120.0 HRVC-180-1 15.1 49.5 16.4 12.4 180 1.5 80.0 HRVC-240-1 20.1 66.0 21.8 16.6 240 2.0 60.0 HRVC-300-1 25.1 82.5 27.3 20.7 300 2.5 48.0 HRVC-360-1 30.2 99.0 32.7 24.8 360 3.0 40.0 HRVC-420-1 35.2 115.5 38.2 29.0 420 3.5 34.3 HRVC-480-1 40.2 132.0 43.6 33.1 480 4.0 30.0 HRVC-540-1 45.3 148.5 49.1 37.2 540 4.5 26.7 HRVC-600-1 50.3 165.0 54.5 41.4 600 5.0 24.0 HRVC-720-1 60.4 198.0 65.5 49.7 720 6.0 20.0 HRVC-840-1 70.4 231.0 76.4 57.9 840 7.0 17.1 HRVC-960-1 80.5 264.0 87.3 66.2 960 8.0 15.0 HRVC-1080-1 90.5 297.0 98.2 74.5 1080 9.0 13.3 HRVC-1200-1 100.5 330.0 109.1 82.8 1200 10.0 12.0 HRVC-1320-1 110.6 363.0 120.0 91.0 1320 11.0 10.9 HRVC-1440-1 120.7 396.0 130.9 99.3 1440 12.0 10.0 HRVC-1560-1 130.8 429.0 141.8 107.6 1560 13.0 9.2 HRVC-1680-1 140.8 462.0 152.7 115.9 1680 14.0 8.6 HRVC-1800-1 150.9 495.0 163.6 124.1 1800 15.0 8.0 240V Length Heating area Total Power/W (3.65W/ft) Current/Amps Resistance Ω/m Part Number m ft 11W/ft² 14.5W/ft² HRVC-120-2 10.1 33.0 10.9 8.3 120 0.5 480.0 HRVC-180-2 15.1 49.5 16.4 12.4 180 0.8 320.0 HRVC-240-2 20.2 66.0 21.8 16.6 240 1.0 240.0 HRVC-300-2 25.1 82.5 27.3 20.7 300 1.3 192.0 HRVC-360-2 30.2 99.0 32.7 24.8 360 1.5 160.0 HRVC-420-2 35.2 115.5 38.2 29.0 420 1.8 137.1 HRVC-480-2 40.2 132.0 43.6 33.1 480 2.0 120.0 HRVC-540-2 45.3 148.5 49.1 37.2 540 2.3 106.7 HRVC-600-2 50.2 165.0 54.5 41.4 600 2.5 96.0 HRVC-720-2 60.4 198.0 65.5 49.7 720 3.0 80.0 HRVC-840-2 70.4 231.0 76.4 57.9 840 3.5 68.6 HRVC-960-2 80.4 264.0 87.3 66.2 960 4.0 60.0 HRVC-1080-2 90.6 297.0 98.2 74.5 1080 4.5 53.3 HRVC-1200-2 100.6 330.0 109.1 82.8 1200 5.0 48.0 HRVC-1280-2 110.8 363.0 116.4 88.3 1280 5.3 45.0 HRVC-1440-2 120.8 396.0 130.9 99.3 1440 6.0 40.0 HRVC-1560-2 130.6 429.0 141.8 107.6 1560 6.5 36.9 HRVC-1680-2 140.8 462.0 152.7 115.9 1680 7.0 34.3 HRVC-1920-2 161.0 528.0 174.5 132.4 1920 8.0 30.0 HRVC-2160-2 181 594 196.4 149.0 2160 9.0 26.7 HRVC-2400-2 201 660 218.2 165.5 2400 10.0 24.0 HRVC-2640-2 221.2 726 240.0 182.1 2640 11.0 21.8 HRVC-2880-2 241.4 792 261.8 198.6 2880 12.0 20.0 HRVC-3120-2 261.6 858 283.6 215.2 3120 13.0 18.5 HRVC-3360-2 281.6 924 305.5 231.7 3360 14.0 17.1 HRVC-3600-2 301.8 990 327.3 248.3 3600 15.0 16.0 Herein, 1 and 2 means the operation voltage, “1”=120V, “2”=240V
Learn More
The HM-cable is an electric heating cable designed to prevent snow and ice accumulation around the home or facility, such as driveway, walkway, stairs and so on.
Learn More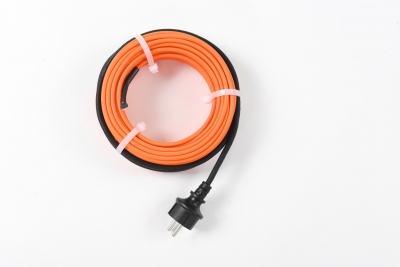
Product advantages 1.Durable and strong structure 2.High water-proofness. IP68 3.Long working life 4.25years warranty 5.Small size ,no increase in floor thickness 6.100% screened with Zero EMF 7.100% tested before delivery 8.Free of maintenance 9.Anti-UV Features and applications • 5.5mm diameter. • Twin conductor; with plug, ready for use. • Zero EMF. • Can be used in humid places. • Multi-layer XLPE material, the mechanical strength of the product can reach class. M2, and will not be deformed in short-term exposure up to 150°C. • This product is mainly used for concrete curing.
Learn More